FASCIA RELEASE DIAPHRAGM EXERCISE.
The diaphragm has the largest concentration of fascia in the body. Releasing the natural movement of the diaphragm allows us to breath deeply and easily, with the many positive consequences that breathing well brings. Breathing is a natural massage and stimulation for all the organs of the body.
Releasing the full movement of the diaphragm is good for all of us, but it can dramatically change, for the better, conditions such as kyphosis, scoliosis and common neck and upper back tension.
RECOMMENDED.
This exercise is really important for everyone and highly recommended for those who have a problem breathing deeply, kyphosis, scoliosis and neck and upper back tension.
I have noticed that many people have not had the experience of how the body feels, internally, as they breath. This exercise helps them to become aware of the action of the diaphragm and to be more in touch with the internal mechanism of breathing. I find people breath much more effortlessly once they understand this missing piece of the puzzle.
REPETITIONS.
1 set.
STARTING POSITION
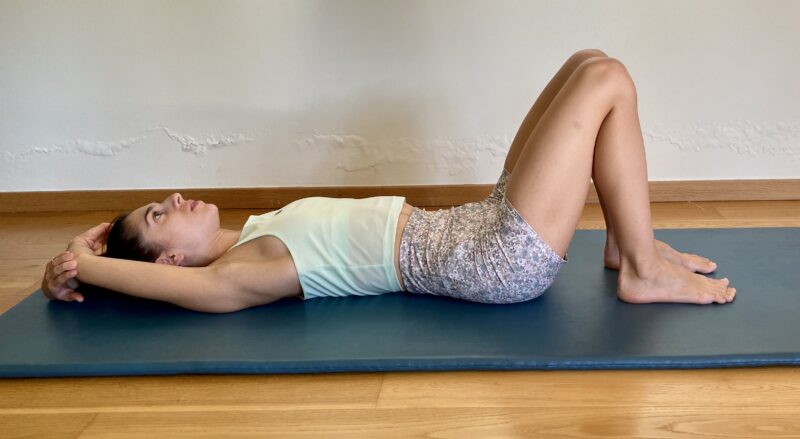
Lie on your back with the knees bent and hip width apart. The leg alignment is really important throughout this exercise. Please refer to my previous blog on leg alignment. https://jennycolebourne.com/good-leg-alignment-is-essential-for-everyone/
Bring the arms above the head and bend the elbows. The right middle finger accesses the fascia through the skin just below the left elbow. The left middle finger touches the skin just below the right elbow. The arms are on the floor. Remember to really surrender the weight of the upper back into the floor. It helps to imagine you are floating on your back in the sea or falling backward onto a comfortable feather bed. Imagination is powerful ia a powerful tool. Use it.
PART 1
BREATHE IN
BREATHE OUT
Keeping the left hip still, it is your anchor, lengthen, or stretch, between the left hip and the left elbow. We need to be gentle if we wish the body to respond. The reason why the middle finger is used is to access the fascia The amount of pressure we use is about the weight of a leaf falling to the earth. No more. Ask yourself if you respond well if someone pushes you! It’s the same with your body, it doesn’t like you to push it around. Use enough pressure so the body will cooperate you, otherwise it’s resistance kicks in.
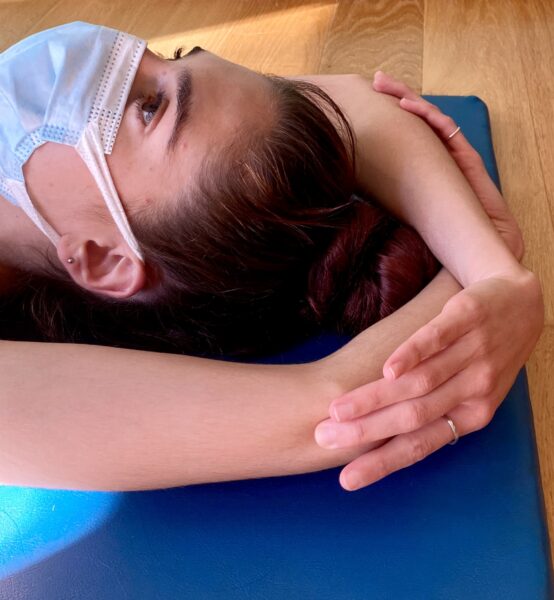
Be careful that you do not go into a side bend. You maintain your sense of axis. It is as if you wish to un-stick your last rib.
STRETCHING EFFECTIVELY.
When we want to stretch an area of the body there is a still and stable point. In this case it is the hip joint. Then there is a post that we pull from. In the exercise this is the middle finger accessing the skin below the elbow. Whatever is in between, muscle tissue, bone is as relaxed and passive as possible AND surrendered to gravity. We allow an opening a stretch to happen and each time we repeat it it will be different because the body has already opened up.
Repeat on the other side.
Repeat the whole thing 3-5 times.
PART 2
Flex the left foot.
BREATH OUT

Slide the heel down so that the leg straightens. Make sure that you keep strictly to the leg alignment. Continue to surrender the weight of the back body to gravity. You should feel a gentle pleasurable “opening” in the Psoas and the front of the hip and thigh.
Leave the left leg straight and stretch the right leg down in the same way.
PART 3
Stay in this position with the arms above the head and the legs straight down.
Take a deep breath in, filling the back of the lungs. The breath should be full but without strain. As you breath in visualize the diaphragm traveling down towards the pelvic floor like a lift in a lift shaft. It does not go front or back, neither does it go side to side, it just travels straight down. Remember the diaphragm is centered in the body at the level of the base of the rib cage.
On the out breath, which is long, slow and complete simply stretch the head up in one direction. You can imagine a golden thread extending from the crown of the head and being pulled back. Imagine the three points of the heels being pulled down in the opposite direction.
Repeat 3-5 times.
Relax the arms down, beside you, allowing the palms of the hands to go towards the ceiling and notice how you feel.
NOTE
Try doing the abdominal exercises after the diaphragm exercise. I think you will find them more effective.
