The symbol above is from Devanāgarī Sanskrit. There are many ways to experience the depth and richness of chanting Om. Om is the divine, creative sound vibration present in everything in the universe. It is the source of creation. When we chant it, we connect with the fullness and diversity of the cosmos, opening ourselves to endless possibilities. The sound Om is not a secret. It is a healing tool available to everyone. Regular practice unlocks its full potential.
Preparing to Chant
Find a comfortable position where your body can be soft and relaxed. The intention is to allow the vibration of Om to flow into every cell. Our bodies are mostly water—around 60% fluid. Inside each cell, two-thirds of this water moves and nourishes, while the rest—blood, lymph, and interstitial fluid—flows quietly, connecting every part of us. When we chant Om, we are not just making a sound; we are vibrating this inner ocean. The long, resonant hum ripples through our tissues, awakens our cells, and invites the fluid within to flow freely. Muscles soften, joints glide, and the breath deepens, as though the inner river of life itself is chanting back. Through Om, we are reminded that we are living, moving water, ever renewing, ever connected—an ocean in motion, expressed through the sacred vibration that begins and ends all things. The more we surrender and relax, the more the vibration carries through our system. We can float on the sound and allow it to guide us.
Using Om in Practice
Focus on areas of the body where you feel tension or discomfort. You can emphasize the three parts of the Om sound on specific chakras. Let the pitch come naturally; sometimes it will be lower, sometimes higher, according to your energy. In a group, it is not necessary to chant together; slightly staggered chanting strengthens the vibration.
The Three Parts of Om
O – Part one of the sound.
Form your mouth into a round shape, soft and relaxed. Focus the “O” in the belly area, around the Manipura (मणिपूर) chakra, the “City of Jewels.” This chakra governs personal power, will, confidence, transformation, and vitality.
AHH – Part two of the sound.
Let your jaw drop naturally and open your mouth comfortably. Draw this sound into the heart area, the Anahata (अनाहत) chakra. Anahata represents love, compassion, balance, and emotional healing. Physically, it resonates in the shoulders and upper back.
MMM – Part three of the sound.
Gently close your lips and let the vibration purr softly. Direct the vibration to the roof of the mouth, activating the Sahasrara (सहस्रार) chakra, the “Thousand-Petaled” crown chakra. This chakra embodies spiritual connection, higher consciousness, and divine wisdom.
Three Om chants are often used before beginning Hatha Yoga practice. At the end of practice, you may choose to sound one Om as completion. Five Om repetitions are said to initiate transformation. Seven Om repetitions correspond to the seven major energy centers. Om can also punctuate your asana practice: after a Sun Salutation (Surya Namaskāra, सूर्य नमस्कार), at the end of a series of forward bends, or after balancing poses. Use Om to connect with the Earth below and the sky above, and to feel the flow of energy within. The possibilities for exploration and healing are endless.
✨ Om is more than a sound. It is a living vibration, a river of life, a bridge between the inner and outer universe.
The breastbone (sternum) is made up of three parts. Between each of these three parts there is a joint, a space that allows movement.
There is also movement available between the breastbone and each rib. You can imagine the ribs like soft, delicate fingers—flexible, sensitive, and capable of subtle motion.
Every joint that connects to the breastbone represents a possibility for movement. This mobility is not only important for physical health, but also for our spiritual well-being, as the breastbone is part of the physical area associated with the spiritual heart centre (the heart chakra).
When we practise sensing and moving these joints with softness and delicacy, we open pathways of ease in the body. Many people find this work deeply relieving for shoulder tension and stiffness.
Exploration
You can do this practice sitting or lying down. Lying down often makes it easier to relax completely.
Place the pads of your second, third, and fourth fingers, of both hands, along the centre of the breastbone. Touch very gently—as lightly as a leaf falling to the earth.
Always touch yourself with respect and love, the way you might touch a newborn baby.
Be open, receptive, and aware, allowing your body to inform you rather than trying to control it.
Gently attune to your breath and notice the natural rise of the breastbone as you breathe in, and its soft release as you breathe out. There is nothing to force—this movement happens on its own. You may find that as you relax, the movement becomes richer and clearer.
As you breathe, sense the expansion of the breastbone both lengthwise (between its three parts) and sideways (between the sternum and the ribs). When we become quiet and attentive, we can feel how much movement is present even in this simple act of breathing.
Exploration with Movement
Both yoga and Pilates include movements with rounded backs and arched backs. This exploration supports both practices beautifully.
Starting Position
Sit with the soles of the feet together, knees gently open, keeping the position relaxed and easy. Find a straight, neutral spine—in Pilates this is called the second position of the spine.
Place the pads of your second, third, and fourth fingers again on the breastbone.
The First Spinal Succession or Rounding the Spine
Using an out-breath (or several out-breaths), begin to round the spine from the very tip of the coccyx. Imagine rounding one vertebra at a time along the back edge of the spine, finishing with the upper neck, the centre of the head, and finally the crown. You can think of the head as the last vertebra for the purpose of this movement. Please refer to my blog about the first spinal succession https://jennycolebourne.com/jerome-andrews-pilates-the-first-spinal-succession/
To fully and richly round the spine, the front of the body must soften—including the breastbone. Use your fingers to gently encourage the breastbone to release inward, exploring whether there is more space to soften.
Allow the back of the body—muscles, fascia, and the space between the shoulder blades and ribs—to spread wide. Let the lower back and pelvis soften and open as well.
The Third Successionor Arching the Spine
Using another out-breath—my wonderful teacher Sonya Solange Minton described this as a soft blowing breath, as if blowing out a row of candles far away—begin moving into the arched spine, or third position of the spine.
Start once again from the tip of the coccyx. Send the coccyx gently behind you. To do this freely, the hip joints—especially the fronts of the hips—need to be very soft.
As you move into the arch, focus on the front edge of the spine. Allow the spaces between the vertebrae to open like fans, one by one, all the way to the top of the head.
Imagine a string attached to the centre of your breastbone, gently drawing it forward. As the breastbone moves forward, the shoulder blades slide closer together—not because you squeeze them, but because they naturally follow the movement. This allows the front of the body to open richly and spaciously. Refer to my blog about the third spinal succession https://jennycolebourne.com/the-third-spinal-succession/
If you would like to see this work in action, please visit my YouTube video: https://youtu.be/ciat0FX2-DI?si=tkejSBKJt3D3ihCK “The Fish Pose: Yoga Knowledge, Heart Energy & the Power of Sound” with my yoga teacher trainee, Stella Tzovara.
Physical benefits: Kyphosis Scoliosis Shoulder tension Stiff neck Psychological benefits: Openness. Happiness. Well being Self love Vitality Remember bones that are alive, have flexibility. They are different from the dry bones, of a dead person.
THE COLLAR BONE IN NEUTRAL OR SECOND POSITION OF THE SPINE
Please refer to my blog about the Second Spinal Succession. https://jennycolebourne.com/second-spinal-succession-and-position-for-refined-pilates-and-yoga/ Place the pads of your middle fingers on the start of the collar bone at the base of the throat. Trace your collar bone with your fingers. Your gentle touch will increase your awareness of the collar bone, its shape and length. Stop at the outside edge of the collar bone, just before the shoulder joint. Do this several time to increase your awareness, and appreciation, of this part of your body. Repeat this, and give yourself the message, that the collar bone has twice the width. You can indicate with your fingers, like drawing a thread, continuing out beyond the perceived boundaries of the body, as well as giving the body space and permission, to feel this wider. Combining this image of a wide collar bone, with the image of the axis, forms a cross shape, that gives us a sense of balance, strength and grounding. See video https://youtu.be/D3toKSKU5Sw When you do this, leave your upper back soft and responsive, especially the space between the shoulder blades, and the spine. You will feel the shoulder blades sliding a bit more together.
THE COLLAR BONE WITH AN ARCHED SPINE OR THE THIRD SPINAL SUCCESSION.
Please refer to my blog about the Third Spinal Succession. https://jennycolebourne.com/the-third-spinal-succession/ Place the pads of your middle fingers on the start of the collar bone at the base of the throat. Touch lightly and sensitively. Consciously soften your upper back and affirm, that your shoulder blades are ready for, easy, movement, relaxing, in particular, the space between the shoulder blades and the spine. Imagine that you are made only of bones. Let the muscles and flesh melt away. Breath easily and naturally. Move the place where you are touching forward in relation to your body. Experiment with how much you can move forward, as you keep softening and allowing movement at the back. Soften the chest to allow for the expansion. It is a process of allowing your body, freedom of movement, rather than forcing. Place the pillows of your middle fingers, softly, on the ends of the collar bone just before the shoulder joints. Move the area that you are touching, back, in relation to your body. Remain aware of the points of the collar bones at the base of the throat, allowing freedom of movement, and at the same time, mobilise softly this end of the collar bone, letting it move back in response, and freeing further the beginning of the collar bone in the forward direction. Apply this freedom of the movement of the collar bone to all your arching movements and see how it adds to the joy of arching.
THE COLLAR BONE ROLE IN A CURVED SPINE, COMMONLY KNOWN AS A “C” CURVE OR FIRST SPINAL SUCCESSION.
Please refer to my blog about First Spinal Succession. https://jennycolebourne.com/jerome-andrews-pilates-the-first-spinal-succession/ Play with the collar bone in the same way that you did for the arched spine or third spinal succession. Be particularly aware of the spreading between the shoulder blades are you move into the curve.
YOUR PRACTICE
PLAY with moving your collar bones in all different directions, to increase it’s range of movement.
EXPLORE AND ENJOY YOUR BODY Experiment with jiggling, and shaking the collar bone, to free it further. One you have explored and freed the movement of the collar bones start applying this new found freedom of movement to different Refined Pilates exercises, both on the mat, and on the equipment, and to yoga asanas. Notice how this practice deepens your movement. Be curious and have lots of fun!
Some years ago, a fascinating experiment was conducted at Middlesex University in England. The goal was to identify which students had the highest IQ. Surprisingly, it was the dance students who scored highest. This challenged a belief I grew up with — that intellectual achievement was the only true marker of intelligence. Over time, and through nearly 50 years of working with the body, I’ve come to understand that intelligence expresses itself in many forms — not just through words or numbers, but through movement, awareness, presence, and subtle sensitivity. A friend recently sent me a list of famous people with high IQs — among them were many actors and performers. One of the highest scorers? The actor behind Mr. Bean! This only further confirms the deep intelligence involved in creative, embodied expression.
Subtlety Is Power: Why Detailed Instruction Matters
There’s a current trend in teacher training that encourages giving students only short, simple cues — quick sound bites. While this might suit fast-paced commercial settings, I believe it diminishes the profound intelligence that conscious movement can cultivate. When we slow down and offer detailed, subtle instruction, something magical happens. We engage attention, we stay curious, and we begin to co-create with the body’s wisdom. Subtle awareness is not boring — it is profound and fascinating. We awaken the intelligence of every cell, and begin to listen deeply to what the body needs in each moment.
🧘♀️ The Brain’s Natural Role — And the Gift of Ease
True embodiment gives the brain a chance to rest. It allows us to step out of the constant overuse of thinking and drop into something quieter, deeper. When we are over-tired, the brain suffers. But when we move consciously — with breath, softness, and intelligent attention — we activate the whole system in a balanced way. It doesn’t matter who you are — young or older, a truck driver or a dancer, new to movement or deeply experienced — when you give yourself permission to move with sensitivity and presence, you enhance your ability to do many things at once. You awaken joy, resilience, and healing. This kind of integrated awareness helps us: 🌬 Float on the breath 🌊 Surrender to gravity 🦴 Soften the joints 💫 Let go of effort and move with kindness And yes — it’s fun! We laugh when things don’t go as planned. We delight in discovering a new sensation in the spine. It’s joyful, it’s playful — it’s life.
💥 The Power of Awareness in Healing
As awareness grows, we begin to heal trauma stored in the body. This doesn’t mean the process is always easy — but it becomes meaningful and alive. We begin to apply what we’re learning, and the transformation becomes real. For some, this might mean: 🌟 Standing upright with ease 🌟 Letting go of chronic back pain 🌟 Releasing tension headaches 🌟 Feeling balanced and emotionally steady These are life-changing shifts, and they emerge not from pushing harder, but from becoming more aware, more sensitive, more in tune with ourselves.
🧬 Intelligence of the Cells: A Cellular Awakening
If you’ve been attending my classes in recent years, you’ll know how passionate I am about awakening the intelligence of the cells. Why wouldn’t we listen to them? We have trillions of them, each one carrying information about our development, our health, and even our ancestral lineage. This isn’t just poetry — it’s biology and lived experience. At one time, I thought my deep sensitivity was a problem. I even tried — briefly — to make myself less sensitive. But I now see that this sensitivity is my gift. It’s what allows me to teach, to heal, and to connect on a profound level. Being sensitive does not make you weak or less intelligent. It makes you attuned. And attunement — to self, to others, to movement, to breath — is a gateway to our full human potential.
💖 Final Thoughts
Whether through Refined Pilates, Yoga, Reiki, or Cranial Sacral Therapy, the intention is the same: ✨ To awaken awareness ✨ To move with joy ✨ To heal, transform, and live fully If this resonates with you, I invite you to explore with me — to move, to learn, and to discover just how intelligent, vibrant, and alive you really are.
During my time at dance school, competition was everywhere. It took a toll on my health, both physically and mentally. However, everything changed when I embarked on my yoga teacher training with Rudrani Farbman. She introduced me to a completely different way of practicing—one that rejected competition entirely, both with others and with oneself. 🌿💖
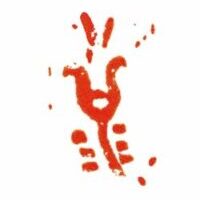
Rudrani emphasized that yoga is not about comparison or striving to be better than someone else. Instead, it is about embracing our individuality and honoring our unique bodies. In her studio, there were no mirrors. As beginners, we were even encouraged to keep our eyes closed. This practice helped us connect deeply with our bodies, minds, and spirits, free from distractions and self-judgment. With our eyes closed, we couldn’t compare ourselves to others, nor could we scrutinize our own movements. Instead, we simply felt. 🙏🌸
As I became a teacher of Rudrani’s method, I learned to give clear and detailed instructions, creating a space filled with support, love, and calmness. Her classes had a deeply meditative atmosphere, something I strive to cultivate in my own teaching. It brings me immense joy to witness students surprise themselves—touching the floor in a forward bend when they thought they couldn’t, lifting their arms higher than expected despite physical limitations. 🌟 These moments happen when people let go of preconceived notions about their bodies and focus on the process rather than the outcome.
Both yoga and Pilates emphasize concentration and mindfulness. Yet, in our modern world, we are often distracted by appearances. Many people look at others in class and think, They are so much more flexible than I am. But this external focus takes them away from their own journey. True progress in these practices isn’t about replicating what we see—it’s about tuning into what we feel. For instance, standing tall isn’t about pulling up the shoulders and straining the neck; rather, it’s about grounding ourselves, feeling connected to gravity, and allowing energy to move freely. 🌍🧘
In our daily lives, we are constantly bombarded by comparisons and competition. But to gain the most from yoga, Pilates, or any form of movement, we must first reconnect with our own bodies. This requires quietness, focus, curiosity, and a willingness to explore emotions and sensations. When we truly engage in this process, our relationship with others transforms as well. 💫
Confidence in our own practice fosters a sense of security and self-acceptance. When we are comfortable in ourselves, we no longer feel the need to compete with those around us. Instead of striving to be better than someone else, we can appreciate their strengths and allow them to inspire us. This shift in mindset removes the harshness of judgment—both of ourselves and others—and replaces it with joy, connection, and mutual growth. 💕
When we embrace the non-competitive nature of yoga and Pilates, we open ourselves to a deeper experience—one filled with self-discovery, acceptance, and shared progress. And in that space of joy and connection, we all rise together. 🌟✨
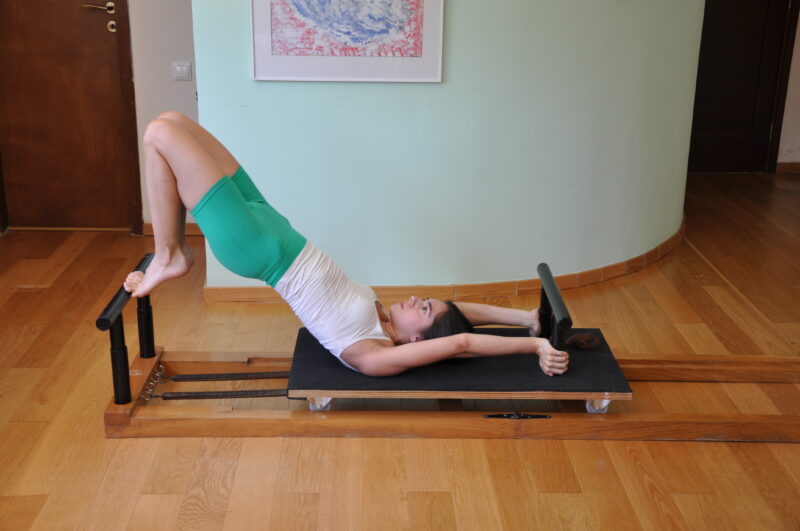
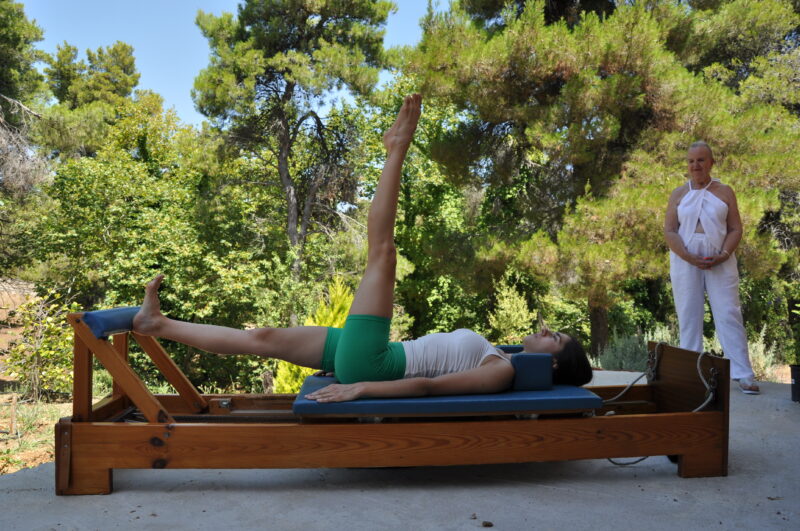
Have the heels as comfortably close to the buttocks as possible.
The fingers are laced, the elbows bent and open. The hands cup the back of the occiput. The thumbs access the base of the skull on either side of the spine. The arms are like an upside down triangle. The base of the triangle is the line between the elbows and the apex, a vertebra in the thoracic spine.
Gently lengthen between the elbows which are, open and on the floor, and make sure the shoulders are completely soft.
Surrender the weight of the upper back completely to gravity.
Make sure the “mask” of the face is looking at the ceiling.
There needs to be enough space between the chin and the breast bone for the pharaohs beard!
BREATH IN
Use the occiput as a boney handle.
Gently pull, with the pads of your thumbs, the bone up towards the crown of the head.
The natural curve of the cervical spine remains.
The balance between the throat and the back of the neck is maintained.
Create more space between the vertebrae.
BREATH OUT
Energise the muscles of the pelvic floor,
Hollow the abdomen.
Drop the lumbar spine to the floor.
Make sure the hip joints remain soft.
Because you connect the muscles of the pelvic floor, hollow the abdomen and drop the lumbar spine so much to the floor the upper body becomes light and the torso lifts a little off the mat,
Maintain the openness of the throat.
The “mask” of the face continues to look towards the ceiling.
The movement is small but exercises the whole length of the abdominal wall.
BREATH IN
Come back down continuously, lengthening, and creating more space between the vertebrae.
VARIATIONS
This exercise can be done with the legs bent up on a ball, box or chair. Having the feet higher helps you to drop the lower back even more.
The legs are more relaxed and it is easier to keep the hip joints released.
Ready to Try It?
Incorporate “Pharaoh’s Beard” into your daily exercise to feel stronger, taller, more relaxed and with an open heart. Whether you’re exploring optimal posture or just looking for a mindful abdominal support, this exercise is amazing.
DM me for personalized guidance!
✨ Let’s Move Together! ✨
Join my classes for expert coaching and a community that supports your wellness journey.
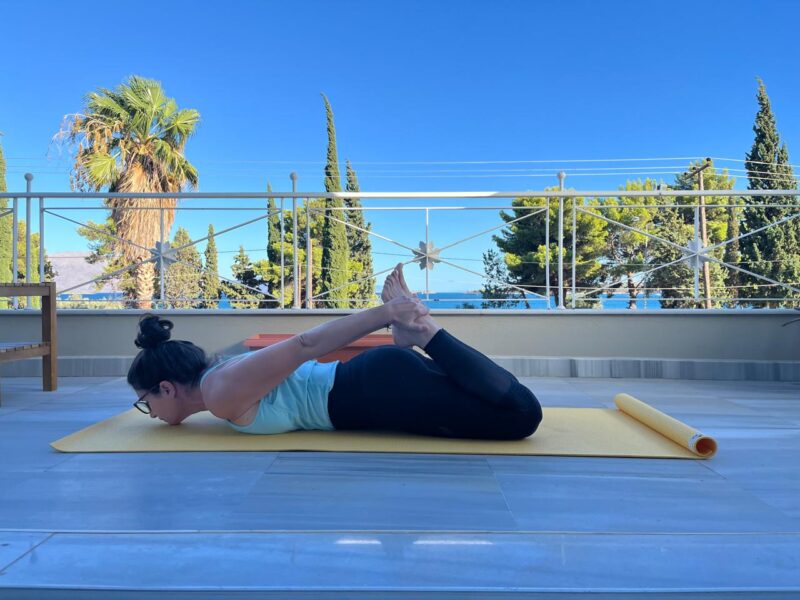
The Bow Pose is wonderful. Please refer to my blog about the third position of the spine or third spinal succession https://jennycolebourne.com/the-third-spinal-succession/. it is essential that you understand all the details about how to safely enter an arched spine. Doing it in the right way is deeply healing. If we do it with a lack of attention to detail, it can cause strain in the spine.
BENEFITS
The Bow Pose is beneficial for all humans.
The Bow Pose is excellent for anyone who has tension, or strain, in the neck and the upper back. It is. super for people that have kyphosis.
It is essential, in our practice, whether our practice is Pilates, or Hatha Yoga, or another form of movement, that we have a practice that balances movements that are curling the spine with movements that are arching the spine. We should include sideways bending of the spine and spinal twisting. In effect the spine enjoys, and is healthy, and feels good, when it’s able to move easily in all directions. The vertebrae, and the discs between them, are like individual joints. The discs between the vertebrae are strong. They have tone and they also need to be flexible. There shouldn’t be any tightness in the discs, they should be available to movement.
The Bow Pose is excellent for people that have backache, not only because of the arching of the spine, but also the gentle stretch in front of the thighs, which leads to a stretch in front of the hip joints, which leads to a gentle opening of the psoas muscle. This muscle can become very restricted and tight through trauma, through shock. It is an archetypal muscle. It also becomes shortened through our lifestyle which often, today, involves us sitting a lot.
Everyone should be conscious of leg alignment. This is particularly true for people that have knee pain. Please refer to my blog on leg alignment https://jennycolebourne.com/good-leg-alignment-is-essential-for-everyone/. The Bow Pose can be adapted. There are easier variations. I will write about this in a future Blog.
STARTING POSITION.
Remember that if you set up your starting position carefully, the rest of the exercise or Asana will be even more effective.
Lie on your tummy with the arms resting down beside you. Have the legs a little bit apart. Turn the head to one side and relax. For those of you familiar with Yoga, this is Savasana on the tummy. The elbows are.slightly bent. Relax around the shoulder blades. Pay particular attention to the space between the shoulder blades. Really soften in that space. The lower back and the buttocks are completely relaxed. The legs can roll in any direction, whatever is comfortable for you. The hip joints are very relaxed. Surrender to gravity.
BREATHE EASILY AND DEEPLY
In a very, very relaxed way, bend the knees, so that the feet come towards the buttocks. Remember the joints are soft, available, for movement. Reach back and take a hold of your ankles with the palm of your hand. Keep the fingers of the hand softly together. You want to create support with the palm of the hand so your feet can literally rest in your hands. The arms throughout the posture remain very relaxed.
Bring the chin onto the floor, the pressure that this creates in the jaw is actually good for us, because as we lift our head, the pressure dissipates and stimulates the jaw to relax. Relaxing the jaw is important because any tension in the jaw, is related to tension in the neck.
The very first movement that you make is, again, very soft. Send your shoulder joints, gently back of your collarbone. It is a small movement but you will feel your shoulder blades automatically gently slide closer to one another. Concentrate on relaxing that space between the shoulder blades. You won’t be forcing the shoulder blades together. The movement will happen naturally, you just cooperate with that, by softening so that the movement can happen fully. A space will open up between the end of the collarbone and the shoulder joint. This small space brings so much relief when we open it. We actually can feel the articulation in the shoulder joint. Often we have so much tension in these areas that we can no longer feel the articulation. Opening this space is very relieving, especially for people with kyphosis. it is also extremely relieving and important for people with shoulder pains or problems such as frozen shoulder for example. As you move into this posture maintain this opening. Be conscious of it. It is a very beautiful space in the body.
MOVING INTO THE ARCH
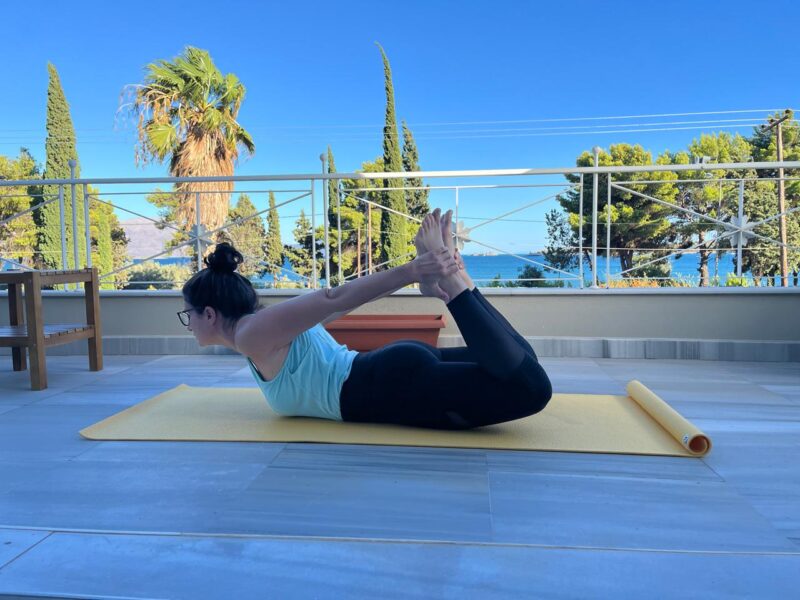
Start the third spinal succession from the bottom of the spine. Refer to my blog for lots of detail. Your focus will be on the front edge of the spine which actually relates to a very important energy channel, or Nadi, which is called the Shushumna. Anatomically focusing up the front edge of the spine starting at your tail, (which comes halfway down the crack of the buttocks. It is lower than many of us think), or coccyx, send one vertebra, at a time, up and back. The spaces, or discs, in between each vertebra, open like a fan. In order for the arching to be effective, the back body needs to be as soft as possible, in order to permit the opening in the front body. This focusing up through the front of the spine, starting from the front of the tail, then going through the front of the sacrum then through the front of the fifth lumber, and so on, means there is a delay, a small delay but eventually that process results in the raising of the head and then the lifting of the upper back. The arch is distributed throughout the spine. There is no strain.
When you have reached the peak of your arch, feel the front of the torso firmly rooted. Use gravity, feel like you have roots in this area, the more you feel gravity, the more you feel your roots, the more the legs will float up.
I suggest that you stay up for five breaths. Please don’t strain. if you are not so strong, stay for less your strength will easily grow.
Continue focusing up through the spine, continue re-affirming the spinal succession, starting at the front of your tail, sending one vertebra up and back, and then the next, reaffirm space between each vertebra opening like a fan.
SOFTEN THE BACK OF THE BODY.
Continue your process of softening between the shoulder blades See how soft you can make that space.
The breath really helps us. Take rich breaths. Your breath well deepen with your practice. it is always essential that we do not force but exercise practice in a way that is appropriate for us.
It is balance between not straining pushing tensing being competitive and on the other hand not being too lazy, being focused. it’s a balance that we all seek to find. The minute you find yourself tensing, or being critical about yourself, let go. It is not helpful.
The first and most important focus on the spinal succession. We keep doing that. At the same time because human beings are amazing and we can multi task.
USE THE BREATH TO DEEPEN THE POSTURE.
Let me be clear when you do this. The arch in the spine with each breath gets deeper. If you feel like your arching is lessening, then you haven’t quite achieved, what we are looking for. Keep searching, keep exploring. It’s fine. It takes us time to realise something. Just be aware that utilising the breath, deepens the arch.
USE BREATH AND GRAVITY
On the in breath we consciously lift the thorax up and back, on the out breath we can think about lifting the feet even higher. This means that whatever part of our torso is on the mat, tis more rooted, more surrendered to gravity. Gravity has an energy, the more we feel the roots, the more we will eventually feel an energy come back to us from gravity, sending us up. This is the ballon that you see when dancers jump and i it looks like they floating the air. It looks like there’s a pause, suspension, before they come down. They are using gravity. We use gravity to go higher into posture.
ROCKING.
Eventually, by practising and exploring this movement of the breath, the movement will turn into a rocking. When you take the in breath, the spinal succession, the lifting our up and back of the rib cage, will take you eventually all the way back to the front of your thighs. And the out breath, as you send the legs up, will bring you all the way to your chin. Let me stress this does not happen through you forcing and pushing, it happens through the spinal succession, and through utilising a rich breath. Be a little patient with yourself. Stay true to the movement and the breath. stay true to not straining or pushing.
THANK YOU
Marina Selini Katsaiti kindly shared these beautiful photos.
She studied yoga with me from her student days, and followed two of my teacher training courses. One was a specially designed dynamic course. You will be hearing more about her in a series I am planning featuring some of my yoga students, and how yoga has influenced their lives.
Marina lives in Galaxidi, Greece.
She teaches yoga, is a university professor, has written a book, as well as writing for several publications.
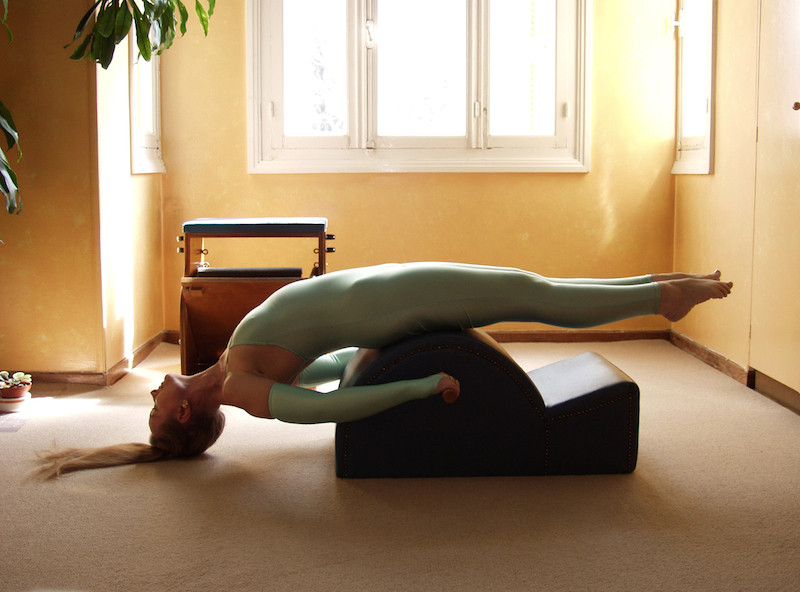
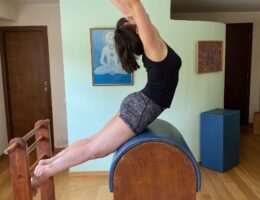
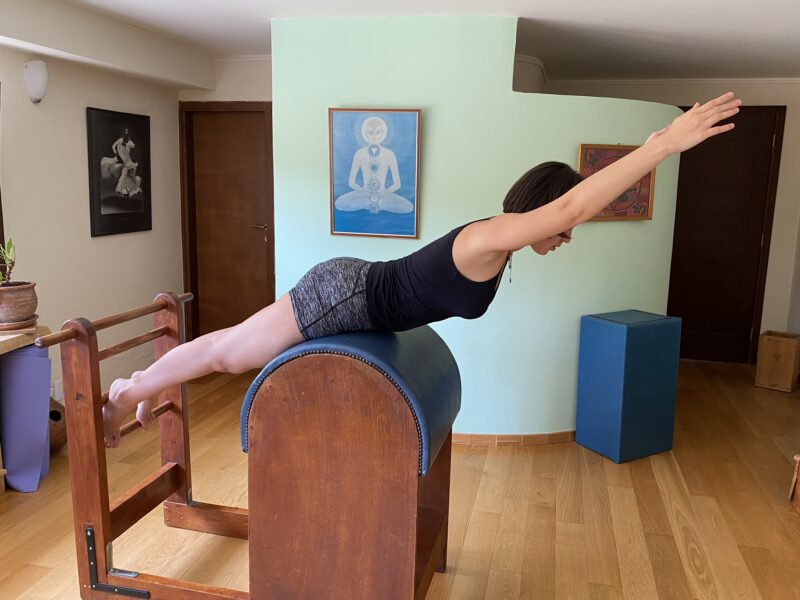
I love the high barrel as a piece of equipment and the round surface of the barrel is friendly towards the body, and the feeling of being high up gives you a different perspective. For older students, it’s a change to be looking and perceiving, from a higher place.
Starting position
Always really take your time to set up your starting position. Avoid rushing. If you start well, the rest of the exercise will follow in a good way
Lie over the top of the barrel spread your toes and place them on the lower rung of the barrel. Wiggle them before to get a sense of the space between the toes. The toes are apart and the heels together, in a soft “V” or first position. The knees are open shoulder width apart. It’s important to engage as many of the toes as you can on the lower rung because they will be an important site support when you start the exercise.
Draping yourself over the barrel, on your tummy, make sure that the hips are on the same level as the shoulders. Relax in the hip joint and allow the coccyx, or tailbone, to soften and hang towards gravity.
The softly, straight, arms are relaxed forward, next to your ears. Make sure the head is completely surrendered towards gravity. I find it useful to relax between the top vertebra of the neck and the vertebra that is melded in to your occiput.
Remember that your pubic phone will always be in touch with the surface of the barrel, especially when you go into the arches. It is a site of support, it supports your arch, so it is , leans against the surface of the barrel.
TAKE A NICE DEEP BREATH IN
The breathing is rich but never strained.
The breath always initiates the movement. It starts just a little bit before the movement.
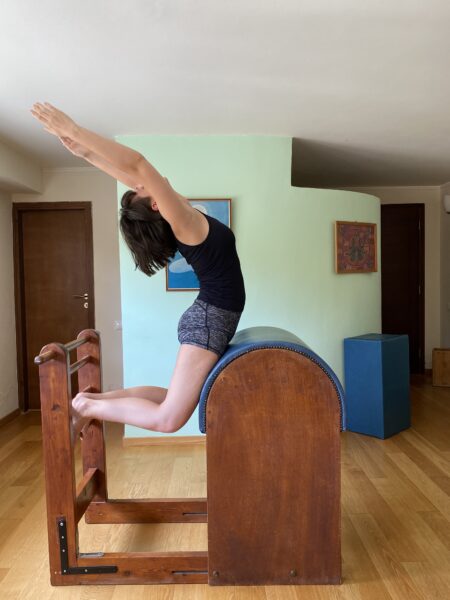
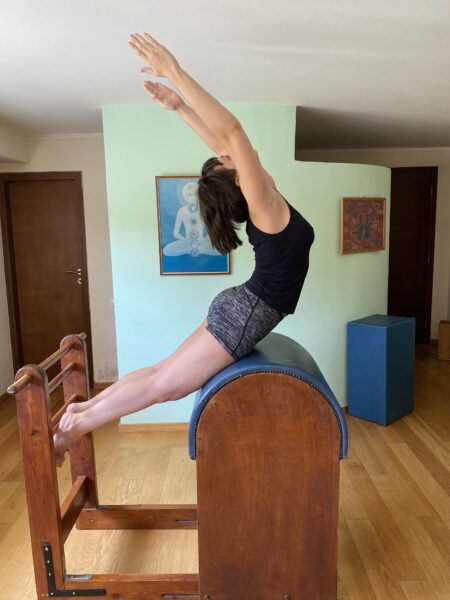
Make sure that your toes, the pads of your toes, are strongly against the bar, feel the pubic bone firmly against the surface of the barrel and begin the third spinal succession following the front surface of the spine sending one vertebrae at a time up and back, opening spaces between each vertebra. Look at my previous blog where the third spinal succession is explained in detail. https://jennycolebourne.com/the-third-spinal-succession/ The process starts at the toes, ends up at the top of the head, culminating in you feeling an energetic line extending from the top of the head.
The arms come naturally up next to the ears.
It’s very important to be very soft at the back of you, very soft in between the shoulder blades. Softening in that space, helps you open the collarbone and send the shoulder joint back of the collarbone. The spinal succession is always the first thing to study after that you can begin, “decorating the cake” Begin enhancing the movement with the breath. Let the in breath take the ribs up and back supporting your arch.
BREATHE OUT FULLY
Send very positive energy from the toes, in between the legs, out through the centre of the spine, moving into the second position of the spine, on a diagonal. The spine is straight. When I say the spine is straight, it’s moving along an axis, the natural curves of the spine, and the flexibility of the spine, are still present on that axis. It feels a little bit like you’re superwoman or superman as you lengthen forward. The legs straighten, the crown of the head is lengthening on a diagonal forward. if you would like more details about the second position of the spine, and how to achieve it, check out my blog . https://jennycolebourne.com/second-spinal-succession-and-position-for-refined-pilates-and-yoga/
BREATHE IN EASILY AND DEEPLY
When you breathe, it should be rich but easeful. Never strain.
This time be very firm with the legs. They stay straight. You may feel the movement more restricted. Avoid your thoughts getting stuck there. Follow the instructions for the third position of the spine. As you arch, feel the energy passing up from the pads of the toes, through the front of the legs, through the front of the vertebrae. It is even more important to be very soft at the back of you, at the same time, as you really use the pads of your feet and press with them. Feel energy passing from the parts of your toes out through the fingertips.
BREATHE OUT COMPLETELY
You have two movements on the out breath.
Return, using your feet, using the straight energetic line to go to the diagonal, superwoman, superman, second position of the spine, a straight spine, lengthening out of the crown of the head.
Then you bend your knees and relax back down into the beginning position, being careful to keep the shoulders in in the same line as the hips. Relax the hip joint and let the tail hang.
REPETITIONS
The Swan is repeated, with care and attention to detail, 3 to 5 times
Each repetition is different.
Listen to the body and respond to the changes that occur throughout the movement.
The Swan is an intermediate exercise. It is an exercise that calls for flow and grace.
EVERYONE CAN ENJOY THIS EXERCISE
As long as attention and loving care are applied to the details of how we do each movement, to a certain extent these things are covered in our basic lessons, that prepare us for a more advanced Pilates practice, as long as this is paid attention to, I see no reason why most people of all ages shouldn’t do the exercise of all ages do this exercise with the exception of pregnant mothers after the third month
The Swan is wonderful for everyone. It’s fun. It’s pleasurable.
It’s particularly beneficial to people that have tendency to kyphosis and to scoliosis.
Enjoy being a swan on the High Barrel.
Thank you to Anastazia Filippopoulou, my teacher trainee, for letting me take these photographs and to share them with you.
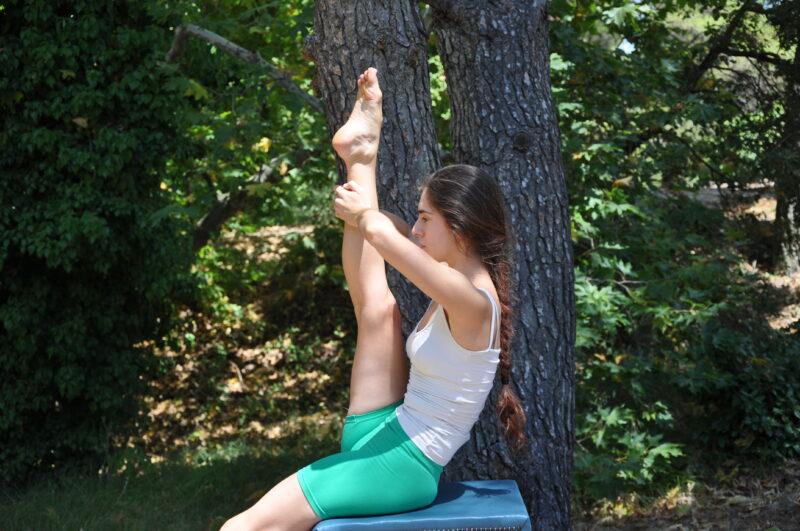
The knee remains in the position that it has come to, in part 1. At a certain point, just before the knee is to straighten, you will probably find there’s a lot of resistance. You will probably find that the tendons around the knee feel very tight. I want you to avoid lowering the knee in order to straighten the leg.
AVOID TIGHTENING THE KNEE IN ORDER TO STRAIGHTEN THE LEG
Themis Andreoulaki. Dancer, Refined Pilates Teacher and Graduate with distinction from the Refined Pilates Teacher Training.
I want you to avoid tightening the knee in order to straighten the leg, at no point does the knee tighten. It’s a joint and it’s designed for movement, not support, so keep the joint relaxed. Instead look deep into, with quality attention,100% focus, gentle focus, no pushing, focus that is imbued with a lot of love and respect for your body and notice exactly where you have the resistance, or tightness and let go of it.
USE YOUR OUT BREATH TO SOFTEN RESISTANCE
Use your out breath to soften wherever that resistance is. The process will be a personal. Different people with different bodies, life experiences and psychology, will have different areas of resistance.
THE KNEE REMAINS IN THE SAME POSITION
There is only one guideline, for all of us, the knee will not move. The knee stays in the position that it’s arrived to. When we get to the point of feeling the resistance then we have to make a study of releasing it. How do I release it? How do I let go?
LENGTHENING THE SHIN BONE
One thing that may help you is to think of the shinbone. Lengthen it. Remember that when bones are alive, they have a degree of flexibility, so think, imagination has power, the shinbone long. It will help think that the toes extend beyond where you see them physically end. Imagine that space has a magnetism as powerful as that of gravity and imagine the toes are being drawn out into space.
You will probably be aware of the new areas of resistance. Your body, your own body with wisdom, will guide you.
A NEW SENSATION OF EXTENDING THE LEG
I promise that you will have a completely different experience of straightening the leg, a completely different sensation, you will feel it coming from a completely different space in the body.
And although the first times, that you do this exploration, it may seem to be slow process.
THE GIFT OF TIME
Give yourself a gift of time. Give yourself a gift of relaxation. Nothing ever good ever came out of forcing.
When you’ve experienced this way of extending the leg 2 or 3 times, then it will become an almost automatic process. A new habit. It’ll be a lot easier a lot quicker.
LEG EXTENSIONS IN A STANDING POSITIONOR AGAINST RESISTANCE
Themis Andreoulaki. Dancer, Refined Pilates Teacher and Graduate with distinction from the Refined Pilates Teacher Training.
And if you want to bring this experience to a standing position or against resistance, one of the secrets is to really, really feel your roots, to really feel gravity, through the supporting leg. It’s the leg that’s a supporting leg that is the strong leg and the more that you feel that ground and the rooting the stronger you will feel and the easier the other leg will float up.
Always be vigilant about the correct leg alignment.
When a movement is done beautifully, it is “right”.
When a movement is done beautifully, with harmony, it heals.
art 1.RLeg extensions are beautiful. When a movement is done beautifully, it is “right”.When a movement is done beautifully, with harmony, it heals.
When a movement is done beautifully, it brings joy to the soul.
When a movement is done beautifully, to the person doing, it feels good, to the person observing it, it is art.
This experience is available to all humans. There are no age, race, body type barriers.
To do a movement beautifully it takes time, patience, discipline, awareness, open mindedness and love. It is never achieved through forcing.
It is worth it.
There are many places and ways of approaching the elegant, long leg. This is just one, and the principals of it can be applied to many movements in Pilates, Yoga and life.
Start by paying attention to your body, as it is at this point in time, without any need to judge it.
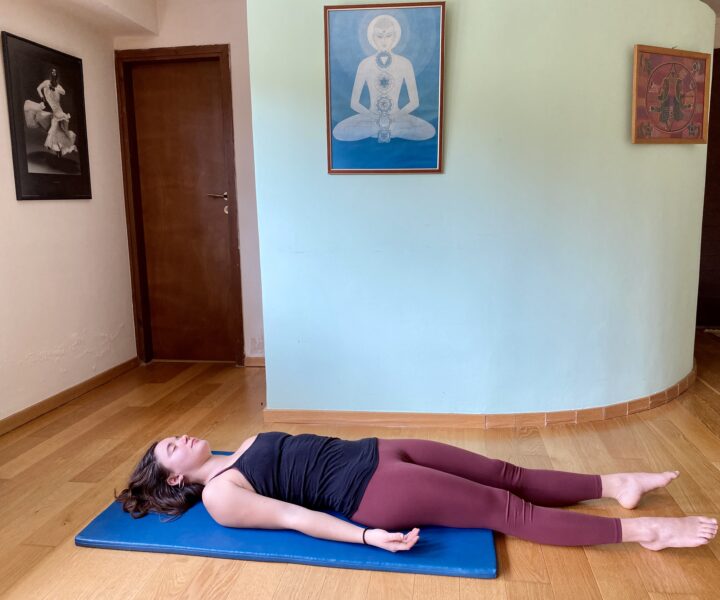
THE BEST WAY TO START A PILATES, YOGA, REIKI, CRANIAL SACRAL SESSION OR DANCE PRACTICE.
There is no separation between body, mind and spirit.
We are magnificent. We are much more than we realise.
Whatever happens, avoid judging anything. STOP criticising. Experience, explore and enjoy your whole self, in either movement, or stillness.
Take the stance that you do not “know” anything. Leave yourself available to new experiences, and leave the door open, to be surprised.
So let’s say we are lying down ( we can practice these principles just as easily sitting or standing).
Let your brain relax and begin sensing the body, through the cells of the body.
I grew up, as a dancer, learning the mind/ body connection. Bossing and pushing my body around with my brain. It is only quite recently, through Bonnie Bainbridge Cohen, to whom I am eternally grateful, that I started to explore, connecting with my body directly through the cells. I, now, find it crazy that I didn’t do this before! There are millions of cells in the body all carrying not only information about, how that part of the body was formed, how it is now, and it’s ancestry.
The nice thing is that, it is direct information, with total lack of judging.
GRAVITY
Surrender the whole of the back of your body to gravity. Be aware that this very different to pushing the back into the floor. Evtually you will have a feeling of being supported.
BREATH
Float on the breath. Let the breath flow, naturally, with ease.
NOTE
All of the above are continuous explorations. We become more and more familiar with them.
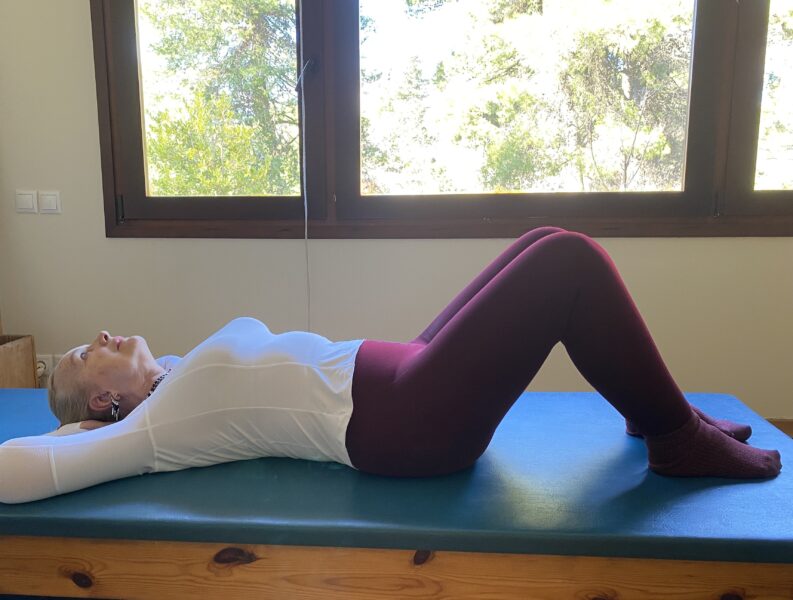
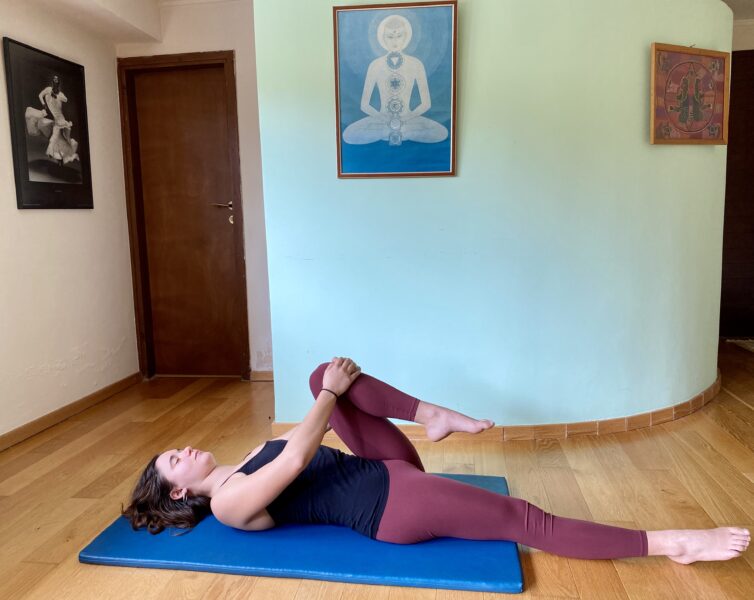
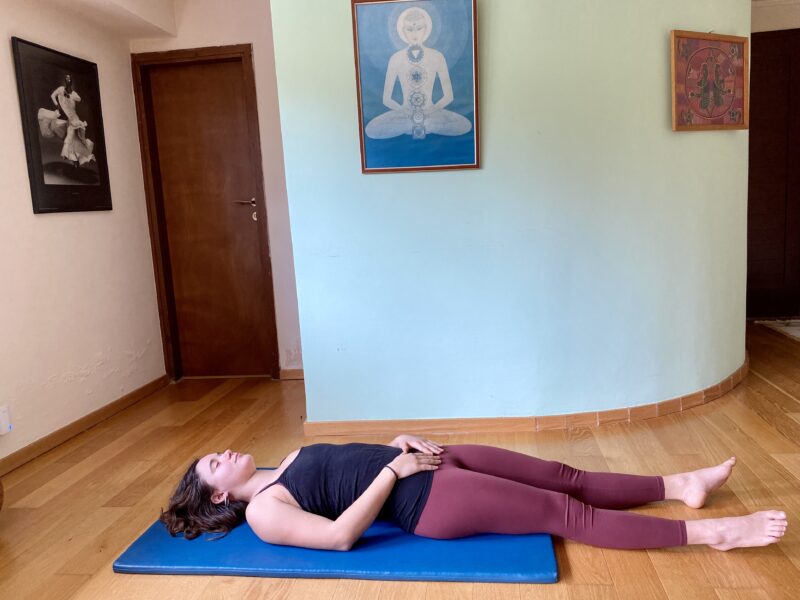
THE TRIANGLE OF THE PELVIS
The “triangle of the pelvis” includes the pubic synthesis and the front edges of the iliac crests. These three, boney points, are parallel to the floor, throughout this exercise. At no point does the pubic synthesis go back or front of the front of the iliac crests.
Decide which side of your body is more present. Let’s say it is the left side.
BREATHE IN
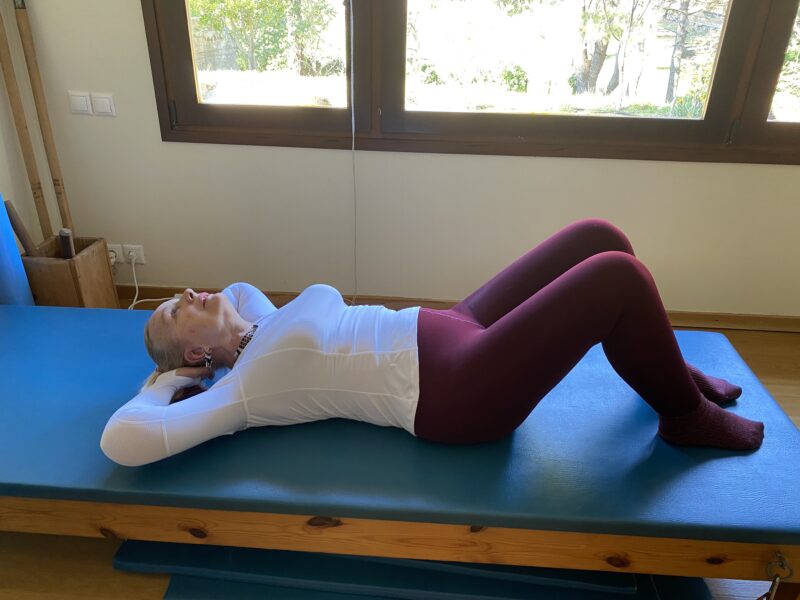
Bend the left knee into the chest. Keep the leg in parallel.
Place the hands, one on top of the other just below the knee at the beginning of the shin bone.
The elbows are bent to the side and the shoulders are relaxed. Surrender the weight of the upper back to gravity.
BREATHE OUT
Gently pull the knee into the chest, maintaining the parallel position. Make sure the two halves of the pelvis are evenly on the mat.
BREATHE IN
Hold the knee where it has arrived to.
BREATHE OUT
Make sure the two halves of the back of pelvis are evenly on the mat. Relax, very deep in front of the hip joint. Gently pull the knee into the chest, maintaining the parallel position.
BREATHE IN
Maintain the position of the knee.
BREATHE OUT
Relax the lower back and ease the knee further into the chest, maintaining the parallel position. Make sure the triangle of the pelvis is parallel to the floor.
BREATHE IN
Don’t allow the knee to move out of the stretch.
BREATHE OUT
Relax the back of the thigh and ease the knee further into the chest. Maintain the parallel position. Make sure the two halves of the back of pelvis are evenly on the mat.
BREATHE IN
Fill the back of the lungs with air. Maintain the position of the knee.
BREATHE OUT
Notice if you have any personal areas of tightness or unease. Use your out breath to soften and relax there. See if you can ease the knees closer.
BREATHE IN
Surrender the weight of the upper back to gravity. Maintain the position of the knee.
BREATHE OUT
Very consciously relax and let go of the other leg. Let it hang down.
BREATHE IN
Release the left leg. Let it slide down, along the floor.
BREATHE EASILY
Give yourself time to notice how the left leg feels in comparison the the right.
When you are ready, start on the other side.
NOTE
Take your time. As you become more familiar with recognising personal areas of tightness and resistance you may not need to go through this specific sequence. Your practice will become more personalised. Just make sure you give yourself the luxury of plenty of time and always do the same amount of breaths on each side. Even if, one side is more apparently problematic that the other.
Thank you Sophia Karasso, dancer and Refined Pilates Teacher Training student for posing for the photos and doing the short videos.